

Advanced rendering plug-in
I recently released a new photo creation plug-in with additional options that will let you manage sun position and other lights.
This plug-in offers also the ability to create equirectangular images to publish amazing panoramas.
Advanced photo creation
The new AdvancedRendering plug-in is available at http://www.sweethome3d.com/plugins/AdvancedRendering-1.1.sh3p (note that this plug-in isn't compatible with Sweet Home 3D from version 3.4 and the features described in this article are directly included in Sweet Home 3D).
To test its features, install Sweet Home 3D with its installer, download the plug-in (see also updates) and install it as explained in User's guide.
Once installed, run it by choosing Tools > Create advanced photo... out of the menu (Outils > Créer une photo avancée... in French version). This new menu item will display a dialog box that looks like Create photo one:
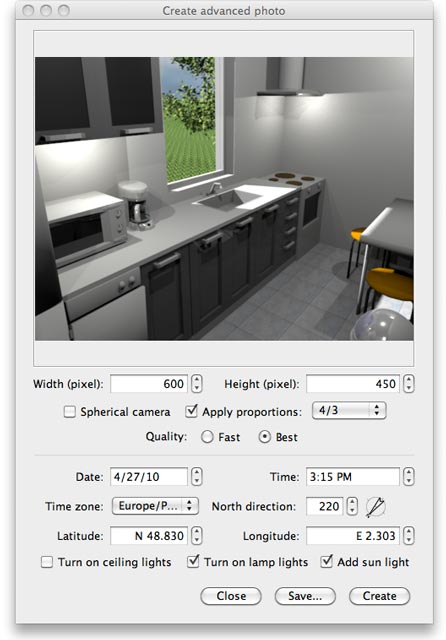
This dialog renders images only with SunFlow rendering engine, that's why you'll find only two rendering qualities.
Thanks to the great contribution of fma, it lets you choose the date, the time, a location on the Earth and North direction to compute an image depending on Sun position.
Beside Sun position, you can also manage lights to improve rendering:
- The Turn on ceiling lights check box lets you choose whether rendering engine should compute lights in the middle of each ceiling.
- The Turn on lamp lights check box lets you choose whether lights defined in furniture library files should be turned on or off. As many of them miserably don't have a good light effect, you'll probably want to use also the 3 lights I defined in the small
basicLights.sh3ffile you may download here. These lights should give you more freedom to light your home since they have no 3D representation. - When selected, the Add sun light check box will generate an additional Sun light during the rendering; this option is helpful when you choose to display texture in the sky.
Keep in mind that all the lights generated during the rendering are still unable to go through transparent panes because of limitations in SunFlow. Nevertheless, Sun light and exterior lights are able to light the interior of a house through window panes with this plug-in, because it doesn't render them. Window panes are simply not taken into account during the rendering process and no reflection won't appear on them too.
Creating equirectangular images
The advanced rendering plug-in offers also the option to create equirectangular images when the Spherical camera check box is selected.
These images with a strange look have always a height equal to the half of their width (2/1 proportions), like the following one generated from SweetHome3DExample3.sh3d file:

An equirectangular image is useful to generate a panorama with Quicktime VR, Flash or Java applets.
Thanks to Open Source tools PanoSalado or PTViewer, you can create for free some beautiful panoramas like the following one:
Newer version of FlashPlayer is required. Download it by clicking icon below: |
Preparing panoramas with PanoSalado
PanoSalado is a tool developed in Flash/Flex. If you want to publish your own panoramas with PanoSalado like the one shown above, here are the basic steps you should follow:
- create an equirectangular image with the Advanced rendering plug-in and save it in a file named
panorama.png, - using any image tool, transform
panorama.pngfile in a JPEG file namedpanorama.jpg(PanoSalado is able to manage PNG images but this small tutorial works with a JPEG image), - download the simple.zip file provided by PanoSalado and unzip
simple.zipin a folder namedsimple, - display Flash Global Security Settings panel and add the full path of the
simplefolder in the text field of this panel, - double-click on the
index.htmlfile found insimplefolder to check PanoSalado runs correctly on your computer, - if it worked correctly, replace the
panorama.jpgimage file found inimagessubfolder by yours, and run again PanoSalado withindex.htmlfile, - if vertical lines in your image don't look straight, edit the included
PanoSalado.xmlfile and increase the value of the attribute named segments.PanoSalado.xmlcontains many other parameters described here. - Finally, if you want to display your panorama on the Internet, upload
simplefolder on your web server; of course, you may rename it and copy the HTML code contained in theindex.htmlfile in your own HTML file if required.
Preparing panoramas with PTViewer
PTViewer is a Java applet. If you want to publish your own panoramas with PTViewer like the one shown below, here are the basic steps you should follow:
- create an equirectangular image with the Advanced rendering plug-in and save it in a file named
panorama.png, - using any image tool, transform
panorama.pngfile in a JPEG file namedpanorama.jpg, - download the applet.zip file and unzip
applet.zipin a folder namedapplet, - download ptviewer.jar file and place it in
appletfolder, - move your
panorama.jpgfile toappletfolder, - double-click on the
index.htmlfile found inappletfolder to check PTViewer runs correctly on your computer. Once it works, you may change applet parameters mentioned in PTViewer documentation. - Finally, if you want to display your panorama on the Internet, upload
appletfolder on your web server; of course, you may rename it and copy the HTML code contained in theindex.htmlfile in your own HTML file if required.
For your information, PanoSalado is distributed under MIT license. PTViewer and Advanced rendering plug-in are distributed under GNU GPL (source code is included in the plug-in).
Have fun!
[Updates]
| April 29, 2010: | The version 1.1 of the plug-in was released to fix a bug in Sun position computing. |
| May 9, 2010: | The version 1.2 was released with new options described in the forum. |
| May 26, 2010: | The version 1.3 was released to support models at DAE/Collada format. |
| June 9, 2010: | The version 1.4 was released to fix a memory leak and rendering problems with double-sided 3D models. |
| August 26, 2010: | The version 1.6 was released with bug fixes, enhancements and new features. |
| November 30, 2010: | Sweet Home 3D version 3.0 was released and includes the features of this plug-in. Values set in the plug-in won't be copied back. |
| December 20, 2011: | The advanced rendering plug-in is not compatible with the new features of Sweet Home 3D version 3.4. Instead, you should use included features in Sweet Home 3D itself. |

Re: Advanced rendering plug-in
To see locally on your PC and easily a panorama in 3d you could also use Panini: get it from here: http://sourceforge.net/projects/pvqt/
If you want to install it under linux (ubuntu) follow this tutorial: http://www.flickr.com/groups/panini/discuss/72157622893257052/

Re: Advanced rendering plug-in

Re: Advanced rendering plug-in

Re: Advanced rendering plug-in
hello there! HELP
I have a problem with the advanced rendering plug-in, when i clic on sweethome3D Tools/create a advanced photo, nothing happen, any windows won't open... I work on Mac 10.6 and with the 4.6 sweethome 3D. Please somebody have an idea of what is going on ?
thank you!!!
Re: Advanced rendering plug-in
Hello,
I understand this plugin is not compatible any more with recent versions. You say that its features are now included in the software. But I can't find where it would be possible to set the date, time, timezone and coordinates... Is it still possible?
In fact I would like to get an idea of the shadows created by the sun at different times, and I understood this plugin would be good for that. What would you advise? Thanks for any suggestion.
And thank you for this awesome software.

Re: Advanced rendering plug-in
When I add modes which emit light (say a luminous model made in blender), the rendered image in sh3D doesnt show any illuminations. The only lights which can be rendered are those already available in the software. How can I include luminous models in my rendered scene?
